|
| Are you a certified vendor in the state of Minnesota? | |
|
Yes, our vendor ID # is 0000217778. |
|
|
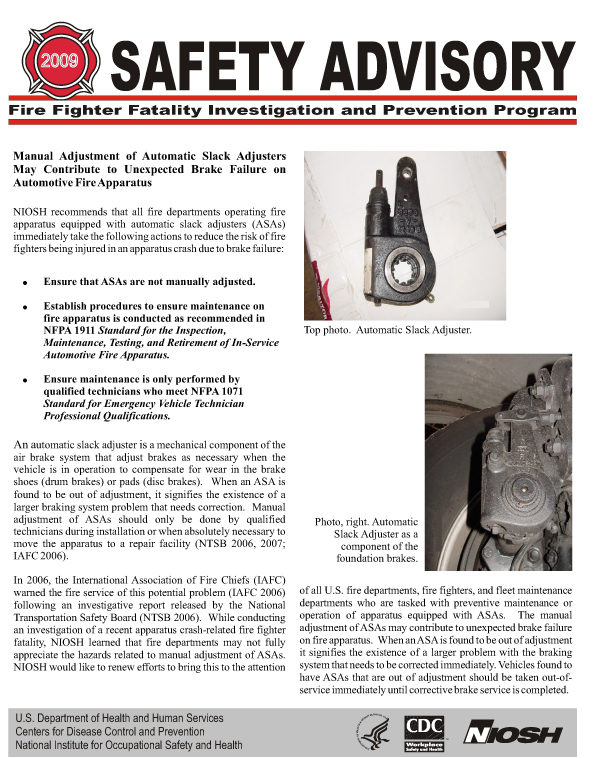
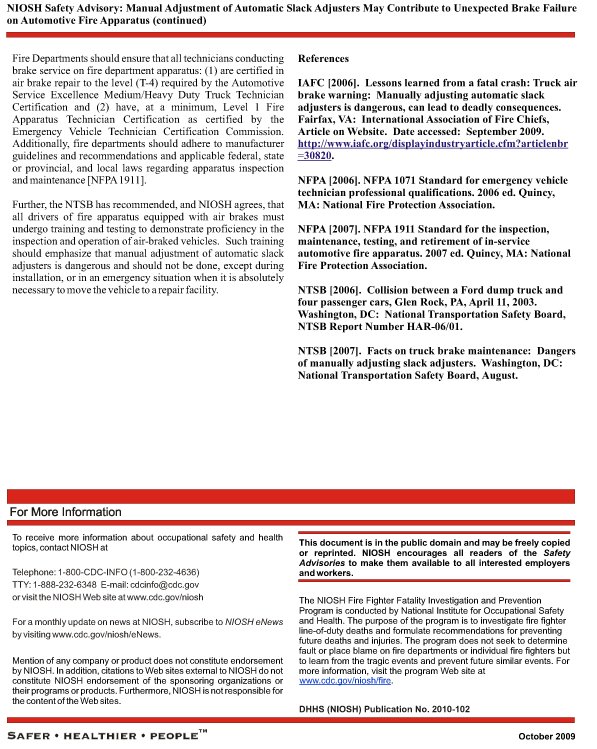
One of our customers wrote: I have a pumper, 1994 International Model 4900. Hale pump, model QSG125-211, 1250 GPM Can you explain to me the function of the engine cooler (open, close) and tank bypass (open, close) controls. The engine cooler and the tank bypass (pump cooler) are both plumbed to the discharge side of the fire pump. The engine cooler is a heat exchanger mounted in the upper radiator hose on the engine, if during operations the engine was to start to overheat the valve could be opened to help control engine temperature. The tank Bypass (pump cooler) is plumbed to the tank and pump discharge water is allowed to go back to the tank for pump cooling, anytime a pump is operating it MUST discharge water or it will overheat so this valve is intended for that. All this being said I recommend keeping both valves closed for the following reasons: Both valves are plumbed with small diameter tubing which MAY be sufficient to cool the pump, the engine cooler is very old school from when engine cooling systems were not sufficient to cool the engine in a stationary application, if your engine is overheating in this day and age the engine cooler is not an answer, get the cooling system repaired and in your case your department conducts annual pump testing and that test will indicate if there is any issues with your cooling system so your chances of engine overheat are slim unless you have a thermostat failure or block the radiator, in either case the engine cooler will not help to keep the engine from overheating. The tank bypass (pump Cooler) if left open will do 2 things, drain the tank to the level the plumbing enters the tank when you leave the pump main drain open and more importantly it becomes an air leak when attempting to draft once the tank water level reaches that same point. The most efficient way to cool your pump is through the Tank Fill valve, this valve is also plumbed from the discharge side of the pump to the tank and is at least a 1” line and valve, get the pump in gear, open the Tank to Pump valve, prime the pump if needed and bring the pressure up slightly with the throttle, open the Tank Fill slightly and then bring your pump to desired pressure, if a water equipped with a water Governor make sure it is in PSI Mode and you are set, if a Relief Valve set it to desired discharge pressure and then open your FF discharge(s) with FF operations going on with water flow from nozzles you can close the Tank Fill until FF flow stops then crack it open again, this flow from the Tank Fill will keep the pump cool, when you crack the valve open you will feel the flow through the control lever, I say crack it open as depending on how your department spec’d the truck the Tank Fill valve can be any size from 1” to 3” so you need to practice on cracking it open, to far on a large valve and your pump discharge pressure will drop to nothing and your Compound gauge will drop to negative indicating Cavitation.
This may
sound slightly difficult to teach everyone but it will keep your pump
from overheating which will cause catastrophic damage to your pump.
Keep the pump cool through the tank fill and the engine cool through
good maintenance. |
|
|
|
|
|
Fire Pump Operational Check List |
|
|
|
|
Fire Pump Winter Operations |
|
|
* At station; drain pump through main
drain, insure Tank to Pump, Tank Fill, Pump and Engine cooler valves are
closed. * Drain all discharge outlets through drain valve. * Remove all suction and discharge caps and drain. * Drain Foam Manifold through drain valve - CAUTION: Foam cell is equipped with a panel mounted drain; DO NOT OPEN FOAM TANK DRAIN. * Drain Pilot and Relief valves through drain valves. * Close all drains prior to leaving the station to avoid valves freezing in open position. * At scene; engage pump and circulate water through pump using Tank to Pump and Tank Fill valves. Do not drain pump at scene unless it will freeze. |
|
|
Rosenbauer recommends that their pump should be left dry all year long. After draining pump run primer for 5 seconds. |
|
|
Can we install Winter Fronts on our apparatus? |
|
|
WARNING! Winter Fronts are designed to restrict air flow and can
cause engine damage/seizure if not used properly! Winter Fronts can be used on most Apparatus if: Following Vehicle manufacturers recommendations. Winter Front is Grill mounted. Winter Front has a single round hole in the center, V style openings can cause fatigue/failure of fan blades. Winter Fronts are only used in extremely cold weather and operator continuously monitors cooling system temperature gauge! Winter Fronts should not be required if the cooling system is equipped with an automatic engine cooling fan. Check with apparatus manufacturer. |
|
|
Use of Auxiliary brakes in slippery weather? |
|
|
The Jacobs Manufacturing Company (maker of the "Jake Brake" engine retarder) lists several cautions about retarder operation under slippery or wet road conditions in their Professional Driver Techniques and Owner's Manual. The major caution, with respect to the retarder's operation on slippery surfaces, warns that the driver should not use the retarder until he/she is sure that his truck is maintaining traction without its use, and then to use the lower power settings on the retarder. Progressively higher power settings should not be used until it is established that the vehicle is maintaining traction in the lower settings. the manual warns, "If the tractor drive wheels lock or there is a fishtail motion, immediately turn off the master switch and don't turn the Jake Brake on until road conditions improve. |
|
|
What are the 3 oil leak classes per NFPA 1915 |
|
|
Class 1 Leakage -
Seepage of fluid, as indicated by wetness or discoloration, not great
enough to form drops.
Class 2 Leakage - Leakage of fluid great enough to form drops, but not enough to cause drops to fall from the item being inspected. Class 3 Leakage - Leakage of fluid great enough to cause drops to fall from the item being inspected.
|
|
|
SAFETY RECALL - IMPORTANT |
|
|
Pierce Manufacturing Inc. has decided that a defect, which relates to motor vehicle safety, exists in certain Pierce custom chassis fire apparatus equipped with TRW fixed steering column. The vehicles involved are: Arrow custom chassis manufactured between 1982 - 1991; Dash custom chassis manufactured between 1983 - 1989; and Dash D8000 custom chassis manufactured between 1987 - 1989. On certain fire trucks equipped with TRW steering column UC35017, the steering column may fail and can cause the vehicle to crash without prior warning. If the lower steering column bearing fails, the bearing race or compression spring will cut into the hollow steering shaft tube. Eventually the tube will wear thin enough for the steering column shaft to fail. The failure is most likely to occur on high-mileage vehicles during low speed, high steering effort events. To determine if steering column failure is imminent, slide up the black rubber floor boot. If any looseness between the lower steering column outer jacket tube and the steering shaft is discovered, the vehicle must be immediately take out of service and the steering column replaced. There may be metal shavings at the lower column area or grinding noises noticed while turning the steering wheel or other steering irregularities. If any of these conditions are present, immediately take the vehicle out of service, inspect the steering column and replace the steering column if needed. We expect that remedy to this defect will become available in October 2008. We expect the time required to perform the remedy, should not exceed 2 hours. The original TRW steering column is no longer in production. Pierce has developed a replacement steering column kit available for purchase. Note: Federal law requires a no-cost remedy only on vehicles less than ten years old. |
|
|
How often should my department pump test? |
|
| According to NFPA 1911 3.1*Frequency; “Service testing shall be conducted at least annually and whenever major repairs or modifications to the pump or any component of the apparatus that is used in pump operations have been made.” ISO Suppression Rating Schedule table 512.B which shows maximum points given for 3 years of annual testing of 100 to zero points for 5 years between 3 most recent tests. | |
|
What can be the cause of my newer fire trucks plumbing deterioration? |
|
|
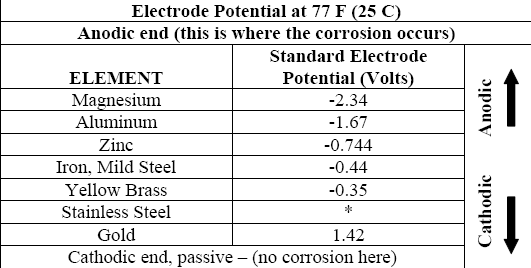
Galvanic corrosion occurs when different conducting materials are connected and exposed to fluid. Galvanic corrosion results in corrosion of the less resistant (anodic) of the two metals, while the more resistant (cathodic) metal is protected. Utilizing the proper sacrificial (consumable) anode extends the life of the pump by corroding the anode instead of the pump. Pumps where there is a significant amount of stainless steel manifolds bolted to a cast iron pump are especially prone to galvanic corrosion. Decreasing water quality across certain regions and the popularity of stainless steel manifolds make this a more common issue in modern Fire Apparatus. All installations, can utilize consumable anodes to extend the life of the pump. |
|
|
Will I damage my pump if I use it for hose testing? |
|
| You can safely test your hose with your Pumper as long as you discharge sufficient water to keep the pump operating cool. Continuously monitor the pump discharge water to assure cool operation. | |
| Anodes are required more now than ever before. | |
|
Cathodic Protection: Why do we need Sacrificial Anodes in Our Pumps Today? Any time we have two different metals that are physically or electrically connected and immersed in water, they become a "battery". A small amount of current will flow between the two metals. One of the metals gives up bits of itself in the form of metal ions to the current in the water. The more active metal is the anode and the less active metal is the cathode, and is protected. This is called galvanic corrosion and over time destroys dissimilar metals in water. Galvanic corrosion is often misnamed "electrolysis". Electrolysis is a similar reaction, but is done by adding an electric current usually to provide a metallic coating. The most common damage from galvanic corrosion in a fire pump is to the cast iron body and related components. Fire fighting pumps utilize many different water sources. Comparing galvanic reaction in a fire pump to a DC battery the active metal (iron body) is the anode and the less active metal (bronze impeller/wear rings, check valve, flap valves) becomes the cathode and is protected. The by–products of galvanic corrosion, such as rust flakes, can also be detrimental to discharge valves, seals, pilot valves, etc. The way we counteract galvanic corrosion is to add a third metal into the circuit. The third metal has to give up its ions easier than the other two metals. This piece of metal the sacrificial anode, in our application, is zinc. Sir Humphrey Davy first developed cathodic protection in 1824 as a means of controlling corrosion on British naval ships. Today we can protect our pumps by using zinc screens and zinc anodes. In the past our pump was provided with some passive protection from anodes in the booster tank. Any time water was introduced into the pump from the tank, they provided some protection. The problem now is most tanks are plastic or fiberglass and do not require anodes. Anodes are an inexpensive addition and will lengthen pump life. The amount of protection a zincanode provides depends on the surface area of the zinc. Usually a zinc surface area equal to 1% of the area of the metal you are protecting is a good starting point. In a midship mounted centrifugal pump it is a good idea to have zinc screens and at least one zinc anode for each main intake fitting. Once a month check the intake screens to make sure they are not clogged or damaged. Also check for corrosion, and replace screens if damage is serious. For the zinc screens to adequately control corrosion there must be a strong electrical connection between the screen and the intake fitting. Remove any corrosion that may be insulating the screen from the intake fitting. Most screens have an adjustable tab on the O.D. of the screen, which can be positioned to ensure a tight fit. Zinc anodes should be checked twice a year for corrosion. Anodes should be replaced when about half of the anode has been sacrificed to corrosion. It is important to maintain the anodes installed on a pump. When the zinc is gone, the metal component it was intended to protect begins to corrode––guaranteed. Zinc screens and anodes cannot perform their function unless they are exposed to water in the pump. Never coat zinc screens or anodes with paint or anything else. Of course, some corrosion of the iron will occur. The severity depends on the water conditions and the maintenance of the anodes. Zinc screens and anodes are optional, however it is important to include them in your pump specifications. The cost is small compared to the cost of a pump body and related components. Anodes can also be added to existing pumps. |
|
| Additional Galvanic corrosion information: | |
| A measure of how dissimilar metals will corrode when placed against each other in an assembly, is shown in the chart below. Metals close to one another on the chart generally do not have a strong effect on one another, but the farther apart any two metals are separated, the stronger the corroding effect on the one higher in the table. Poor water quality can affect corrosion. Anodes help protect the pump and the ferrous plumbing components. This is the same type of anode that is used in most home water heaters to protect against corrosion over the life of the unit. This protection is also recommended for fire pumps. | |
|
|
|
|
Information courtesy of HALE Products, Inc. |
|
|
1-800-EAM-3911 |